Towards A World Without Computer Viruses :-p
by Dr Azmi Mohd Tamil
Teaching sucks! No, I am not referring to the low pay, long hours, high workload, lack of benefits nor to my inability to get promoted.
Instead I am referring to our continuous exposure to infection by computer viruses. Whenever we teach, we have to insert our thumbdrives into strange computers. If we bring our own notebook to teach, at the end of the lecture the students will be inserting their thumbdrives into our notebook to get a copy of the lecture. When students come to us for help with their analysis or coursework, they will be inserting their thumbdrives into our computers, and only God knows where these thumbdrives had been before and where they had been inserted into before……eeeeeewwwwwww.
With the pervasiveness of thumbdrives, a new type of viruses spread. Some call it worm viruses but I call it “a pain in the @$$”. Whenever you plug in a thumbdrive into an infected computer, the thumbdrive gets infected in return. The virus tranfers an executable file and an autorun file into the thumbdrive. When you plug in the infected thumbdrive into another computer, the autorun file gets executed and the computer ends up being infected.
And the vicious cycle continues until someone takes the trouble to disrupt the cycle by removing the infection ……if he can.
I dread the idea of being badly infected and I dread the idea of reformatting and reinstalling my (many!) computers. So I go the extra distance to protect my computers. I make sure that all my computers have at least 3 levels of protection;
- A good firewall programme – I used to rely on Zone Alarm but due
to a drop in the performance of the computer with Zone Alarm running in the background, I now rely on the Windows Firewall. - A good anti-virus programme – Norton Anti-Virus (NAV) by Symantec
is one of the better ones. My university uses the corporate version of NAV for all its computers but NAV is not impregnable, as I have found out to my detriment. - A good anti-spyware programme – I used to rely on Lavasoft’s Ad-Aware but nowadays most good anti-virus includes an anti-spyware.
As for the “extra distance”, I enabled viewing of hidden and system files. So whenever an infected thumbdrives is plugged into my computer, I can see the infected files and delete them manually. But it doesn’t really help if the autorun file from the infected thumbdrive is able to infect my computer in the first place.
So can we block that from happening? Is it even possible to disable the promiscuous autorun feature?
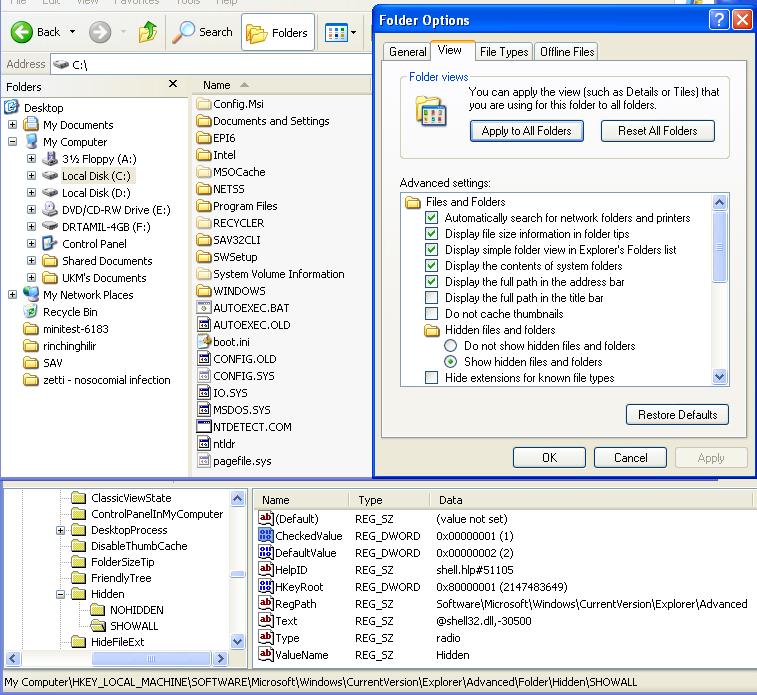
Viewing of Hidden/System Files
First let me show you how to view hidden and system files.
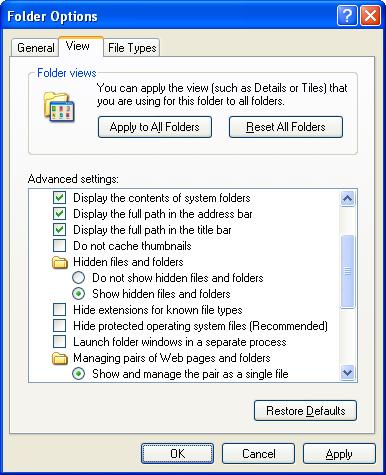
- Open up your Windows Explorer. On the menu bar, select “Tools“, then “Folder Options“. Click on the “View” tab.
- Enable the following;
- “Display the contents of system folders” – since viruses tend to be hidden in system folders.
- Under “Hidden files and folders“, enables “Show hidden files and folders“.
- Disable the following;
- “Hide extensions for known file types” – you will be able to differentiate the viruses from your normal files although they are masquerading using the names of your own files or common programmes.
- “Hide protected operating system files“.
- Click on the button “Apply to All Folders“.
By now you should be able to see some hidden files. The icons of hidden files are slightly faded compared to icons of normal files.
If you still can’t see them and you noted that the changes that you made earlier to the folder options, had reverted to as before, then your computer is already infected by viruses. How to rectify that? That I will cover in the later part of this
article.
Disable the Autorun Feature
Let us disable the autorun feature prior to that. Thumbdrives use the same autorun feature to load files when the drives are plugged into the USB port. Viruses relies on this autorun feature to spread from thumb drive to PC. Disabling the autorun feature prevents viruses from spreading.
For XP Home users, follow these steps;
- To begin, click Start and then click Run.
- Type regedit and click OK. The Registry Editor window will open.
- In the left pane, navigate to:
HKEY_CURRENT_USER
Software
Microsoft
Windows
CurrentVersion
Policies
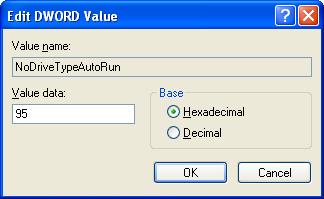
Explorer. - With Explorer highlighted, in the right-pane right click the value NoDriveTypeAutoRun and select Modify from the drop down menu. The base value will be set to Hexadecimal. If not, select Hexadecimal.
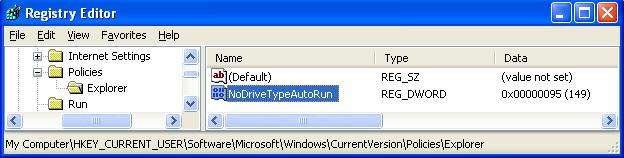
- Type 95 and click OK. This will stop Autorun on removable/USB drives, but still allow it on CD ROM drives. If you want to disable autorun on both, substitute b5 for the 95.
- Exit Registry Editor by selecting File, then choosing Exit from the menu.
- You will now need to reboot your computer for the changes to take effect.
For XP Pro users, follow these steps;
- Click Start and then click Run.
- Type gpedit.msc and click OK.
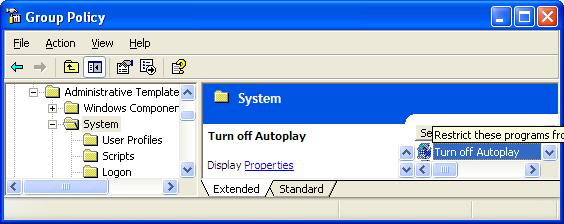
- The Group Policy window will open. In the left pane, double-click Administrative Templates.
- In the right pane, double-click System.
- Scroll down the list and double-click Turn Off Autoplay.
- In the Turn Off Autoplay Properties window, select Enabled.
From the dropdown next to Turn Off Autoplay on, select All drives and then click OK.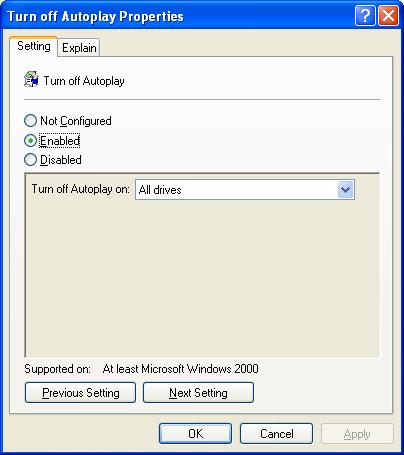
- Exit Group Policy by selecting File, then choosing Exit from the menu.
- You will now need to reboot your computer for the changes to take effect.
Removing the Infection
If you are already infected with such worm viruses, chances are that the regular anti-viruses are useless against them since these viruses already made changes to the registry. The changes made the registry executes the viruses every time Windows is running. The registry regards these virus files are part of the system files, therefore disallows the anti-virus programmes from detecting or removing them. Even if you managed to removed them using MS-DOS Prompt or Command Line Interface, the registry immediately replaces the deleted files.
Therefore the attempt to remove the viruses have to done within a DOS environment. And you need an anti-virus programme that work in a DOS environment. Previously we could rely on McAfee antivirus boot disk. I still remember carrying such diskettes on me to help clean up computer from viruses in the past. Unfortunately McAfee antivirus boot disk only works on partitions that are using the FAT file system. In this age where most systems runs on FAT32 or NTFS partitions, it is an obsolete solution, well past its expiry date.
So I use Sophos Anti Virus 32 Command Line Interface (SAV32CLI) instead. I also use some DOS command such as dir /a:h, attrib -s -h -r and erase. Another useful programme that I use is TweakNow RegCleaner Standard.
Installing SAV32CLI
Download an emergency copy of SAV32CLI from http://www.sophos.com/tools/sav32sfx.exe.
On an uninfected Windows computer, run this file to extract the contents into a SAV32CLI folder. Visit this URL; http://www.sophos.com/downloads/ide/
and download the latest virus identity (IDE) files. Unzip the contents of the IDE files into the SAV32CLI folder. We need a medium which can be write-protected. Since the contents is more than 20MB, we have to burn the contents onto a CD/R or CD/RW. Finalised/close the CD/R or CD/RW.
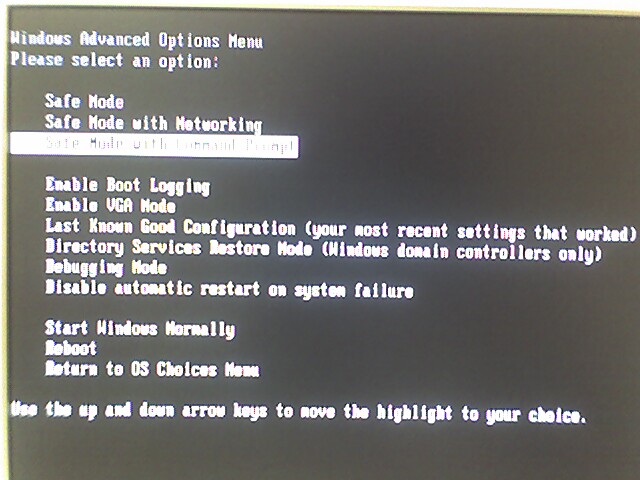
Restart the computer in Safe Mode
- Go to Start|Shut Down. Select ‘Restart’ from the dropdown list and click ‘OK’.
- Windows will restart. Press F8 when Windows restarted. In the Windows Advanced Options Menu, select the third option ‘Safe Mode with Command Prompt’.

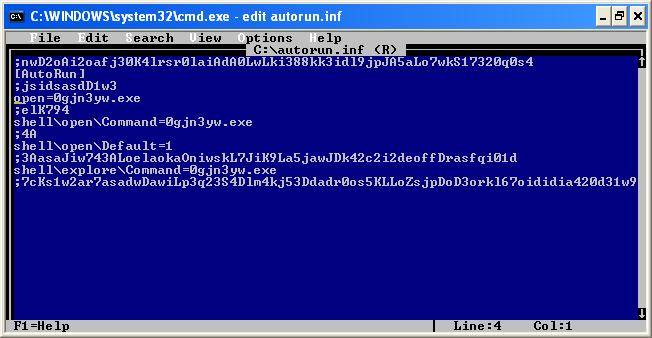
Removing Hidden Files
This step may not be necessary but based on my own past experiences, this method will remove any recalcitrant viruses.
-
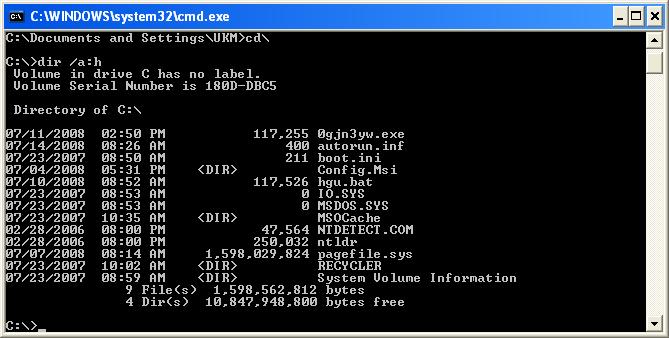
- At the command prompt, type dir /a:h
- This will display all hidden files. As you can see in the example below, there are 3 virus files;
- 0gjn3yw.exe
- autorun.inf
- hgu.bat
-
- To remove the System, Hidden & Read-Only (SHR) attribute, type the following commands (change
the filename according to what is displayed on your screen);- attrib -s -h -r 0gjn3yw.exe
- attrib -s -h -r autorun.inf
- attrib -s -h -r hgu.bat
- To remove the System, Hidden & Read-Only (SHR) attribute, type the following commands (change
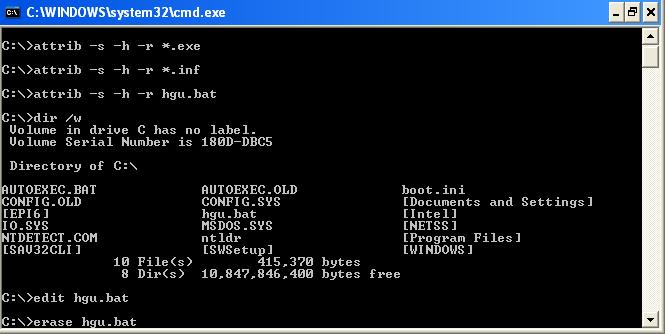
- Delete the virus files by typing the following command;
- erase -s -h -r 0gjn3yw.exe
- erase -s -h -r autorun.inf
- erase -s -h -r hgu.bat
- Type dir /a:h again to ensure that there are no more hidden virus files.
- Repeat step 1 till step 5 on all the harddrives in the computer.
Running the SAV32CLI
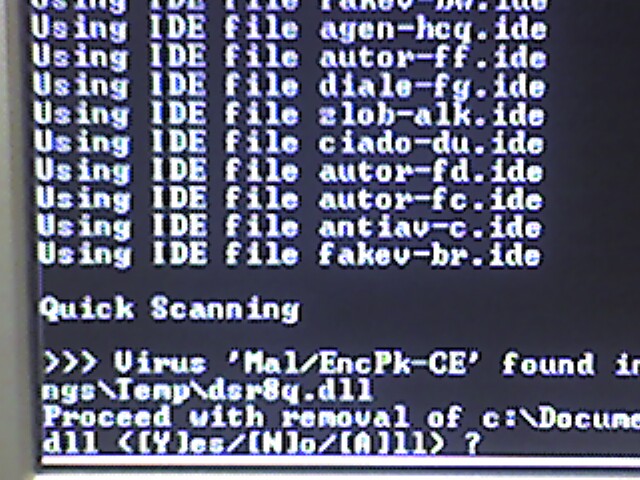
- At the affected computer, place the CD in the CD drive (D: in this example). At the command prompt type
D:
to access the CD drive. - Type:
CD SAV32CLI
to change the active directory. - Then type:
SAV32CLI -REMOVE -P=C:\LOGFILE.TXT
to remove the infected files. - Wait until the software detect the first virus. Type A (for All) when asked “Proceed with removal of ……….”
- Now you can leave it running on its own for the next few hours while it removes all the infected files. It took 2 hours to scan my almost full 60 GB harddrive.
- You may want to repeat the command again to clean all the other harddrives and your removable drives i.e.;
SAV32CLI -REMOVE D: E: F:
Repairing the Registry – Removing the Virus Registry
I used to do this manually by editting the registry. Now I use TweakNow RegCleaner Standard instead.
- Download and install TweakNow RegCleaner
Standard from http://www.tweaknow.com/RegCleaner.html - Run the programme and set the settings to “Custom” and “Expert“.
- Click on the “Clean Now” button.
- Follow the screen instructions to remove the extraneous registry.
Repairing the Registry – Viewing Hidden Files
Earlier I mentioned that if you tried changing the folder options to view the hidden files and failed, maybe you have been infected with a virus. After removing the virus with SAV32CLI, now you can repair the registry.
- Click Start -> Run
- Type regedit and click Ok.
- Find the key:
HKEY_LOCAL_MACHINE
SOFTWARE
Microsoft
Windows
CurrentVersion
Explorer
Advanced
Folder
Hidden
SHOWALL
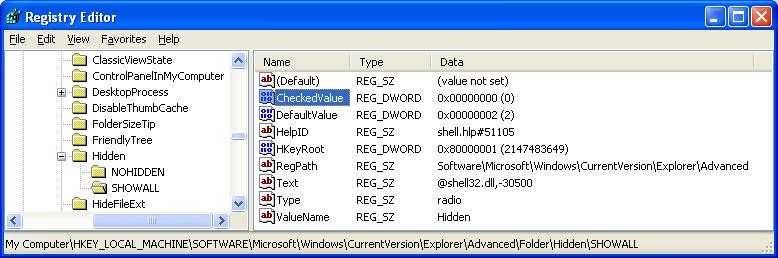
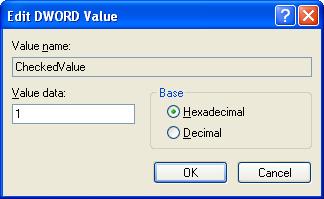
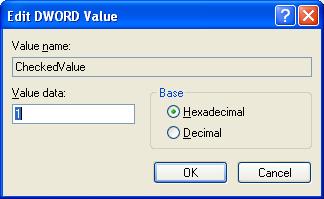
- Look at the “CheckedValue” key. This should be a DWORD key (hexadecimal) with a value of 1. If not, change it
to 1.
- The “Show hidden files & folders” check box should now work normally. Check it out.
- Now clicked on NOHIDDEN and change the “CheckedValue” value to 1.
- Now clicked on SHOWALL and change the “CheckedValue” value to 0.
- Re-check the folder options.
- Enable “Display the contents of system folders“
- Under “Hidden files and folders“,
enables “Show hidden files and folders“. - Disable the “Hide extensions for known file types“
- Disable the “Hide protected operating system files“.
- Click on the button “Apply to All Folders“.
- Now clicked on NOHIDDEN and change the “CheckedValue” value to 2.

- Now clicked on SHOWALL and change the “CheckedValue” value to 1.
- Exit Registry Editor by selecting File, then choosing Exit from the menu.
- You will now need to reboot your computer for the changes to take effect.
Conclusion
The above steps would help to clean your computer from viruses. The steps are not too difficult to do. I only hope that the IT administrators in UKMMC could adopt some of the above procedures to reduce the chances of virus infection in UKMMC.