Recent discussion on home safety & security in the egroup has ended up with the suggestion of the next BTM to be held at my house. Whoa! A quick look around the house and I have to turn down the suggestion. There is no way I could accomodate the group in my miniscule house. So I came up with the next best thing, an article on how I secured my home, DIY. Hopefully this would suffice 😉
This is at best, a simple guide to interested palmx members on how to do it yourself, without forking huge amounts of money to certified security consultants. There may be better & cheaper ways around, so do keep your eyes & ears open.
Home Security
Ever since the robbers struck 3 of my neighbours place (at daytime!), just a few months after we moved in 9 years ago, I’ve been installing various types of DIY alarm/security systems to secure my house. Apparently I was spared since I changed all the locks upon moving in. Once I jury-rigged a car alarm system for my house and it lasted for a few months before it broke down. The contact sensors that I jury-rigged just couldn’t handle it. Anyhow the wires running all over the house was a pain and an embarassment whenever we have visitors. So out it goes.
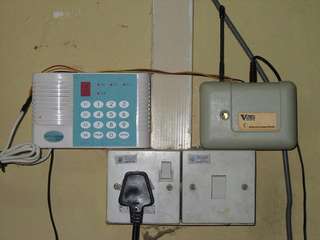
Later I saw an advertisment/promotion for a wireless home security system in the newspapers in April 2000 and I bought the basic set from Parkson Grand KLCC for RM399. The brand name is “Victoria” and consisted of;
- 1 control panel cum alarm (main unit),
- 2 magnetic sensors,
- 2 remote controls,
- 1 3-pin adaptor for the main unit and
- 2 signs that says you are protected by “Victoria” Alarm, which I didn’t use for obvious reasons.
It is pretty simple to install since you just do the following;
- Install the magnetic sensors at the front and back door (use 4 small nails to secure the 2 pieces of sensor components, the small one on the door and the other to the wall beside the door). The wireless unit is attached to the wall using the supplied velcro pieces.
- Plug in the main unit to the power supply in the bedroom
- Use the remote to activate it at night or upon leaving the house
- Don’t forget to deactivate it in the morning or upon returning home by using the supplied remote, else you’ll be hit by the ear-splitting alarm. The darn thing is loud, loud enough to wake up the dead.
How does it work? Whenever the door is opened, the two sensor components are separated and a signal is sent to the wireless unit. The wireless unit will flash a green LED lightand transmits a signal to the main unit. If the main unit is already activated, the alarm will sound; else, the signal will be ignored. The sensors use a single alkaline battery, the usual type that we use in our car alarm remote. It last quite long, about a year or more. You have to change it when the LED light turns red.
A few months after I installed the alarm, my landlord who stays right in front of my house was broken into at night. The thieves entered via the window and left using the door. Then robbers struck my in-laws house when they were away for medical treatment. The robbery was only discovered the next day by the neighbours. This made me realise that I should upgrade my system to secure other modes of entry and include a dial-up system so that I’ll be informed even though the alarm is triggered when I am not at home.
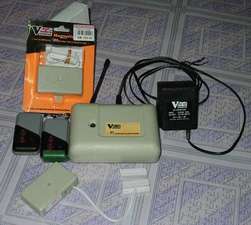
I contacted the supplier in November 2001 and managed to acquire the dialler (RM300) and extra sensors. The dialler can be seen in the picture above, the bluish thing to the left of the main unit. It is pretty easy to install, just connect the black wire to your phone line and the other wires to the main unit. Then record the message that you want to be send when the alarm is triggered. Then key in up to 4 sets of phone number that the dialler will dial when the alarm is triggered. You can even secure it by keying in a password.
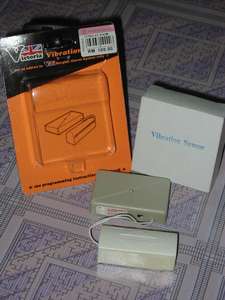
Among the extra sensors that I picked up were vibration sensors which could be installed on the window panes. If the windows were broken or moved, the alarm would be triggered. The recent price quoted for it was RM90 per set.
To feel even more secure, you could buy the Passive Infra-Red sensor with rechargeable battery and transmitter at RM280. It has an independent adaptor and certain length of wire attached to the PIR. It is considered wireless because you do not need to link it to the control panel. It works like any other sensors. The transmitter that comes with the PIR will send the signal to the control panel if any motion is detected. This PIR can be programmed as add-on to the Victoria System.
Since my area is notorious for power failure, I attached a UPS to it. So the system will still run during a power failure. You can buy a UPS for around RM200 at any computer supply shop.
The “Victoria” system is suitable for a small house or apartment. For those with a bungalow or a large house, you may want to consider the “USA” alarm system. A basic set consists of;
- 1 unit 8-zone control panel with back-up battery
- 2 pcs of reset keys
- 1 pc power adaptor
- 1 unit external siren with strobe light and tamper switch
- 2 pcs of magnetic sensors with transmitter
- 2 pcs of wireless remote control
- Installation included
The price quoted for it in December 2001 was RM1080. Apparently it was recently quoted at RM1500 😛 (comes with 6 magnetic sensors instead of 2)
The beauty is that any accesories from the Victoria alarm system can be used with the USA system; ie the dialler, the magnetic sensors, the vibration sensors and the Passive Infra-Red sensors can be reused with the USA system. So if I ever need to upgrade, I can still reuse all the accesories.
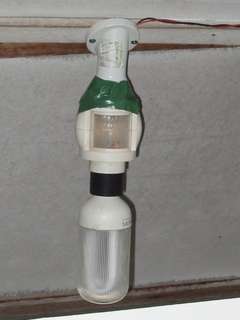
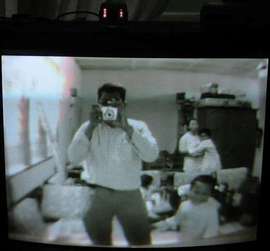
Enough with the alarm system. How about around the house? Since I do not own the house, I couldn’t do much. I did install fluorescent lighting at the side of my house since the robbers keep trying to enter my house through the side windows. At the back, I jury-rigged a light bulb connected to a motion sensor. It will switch itself on whenever it detects movement at night. The red light that you see in the second picture indicates that it has detected movement. You can get customised motion-triggered lights at a fair price at Ace Hardware in Taman Melawati.

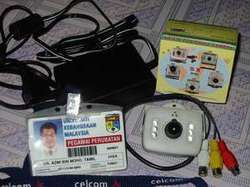
Since I was getting tired of playing cat and mouse with the crooks, I decided to install surveillance cameras around the area. Shown below is one of the cameras. It is the infra red type which can capture video at night. It’s smaller than my id card! As you can see it the second picture, the camera (on top of the TV) emits infra red light which enables it to take video in the dark. That model is available from Jalan Pasarat a very cheap price. Don’t forget to pick up the dome to protect it. If you want to use wireless cameras, you can get it for RM380 for one colour CCD camera plus transmitter and one transmitter receiver. The place to check out these items is at Great Electronic Centre, 71 Jln Pasar, Pudu, 55100 Kuala Lumpur (Tel: 03-92223986, Fax: 03-92223987).
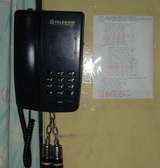
Other simple things that you can do is to keep all the emergency phone numbers by your phone. Not just 999, 994 or 991 but the exact phone numbersof nearby “pondok polis”, police station, firestation etc.