This coming Deepavali and Hari Raya Aidil Fitri holidays is indeed a very long holiday. Most of us will be away in the kampungs from 21st October 2006 till 18th October 2006. Some of us may even extend our leave till 29th October 2006. So our homes will be left unattended for up to nine days! Many things could happen in that nine days. Many of us have friends or relatives whose homes were broken into and burgled by “foreigners”. One of my former classmate had his house broken into just last week by 4 parang-wielding “foreigners” in Johor Bahru. Luckily none of his family members were hurt.
Most of us have broadband connection at home, so how could we make use of the connection to monitor our homes?
Allow me to demonstrate how………..
Picking Up The Required Equipments
First we need a digital video recorder (DVR). You have a choice of either
- a pc-based one

- or a stand-alone one.

I opted for a stand-alone DVR, model NVR1004+ (now rebadged by CNEX as DVR5804) which I bought from Reginex Low Yat Plaza for RM1300. I believe the price is much lower but since I don’t speak their language, I think I got screwed. So try to bargain with them. I did check the prices elsewhere such as in Jalan Pasar (Pudu), but they were quoting higher prices. The DVR wont work without a hard drive, so I bought a 320GB hard drive for RM360 from Cycom, another shop within Low Yat Plaza. With a 320GB HD, even with almost continous recording, it will be 4 weeks before the previous recording is overwritten.
I didn’t go for a pc-based DVR since my past experience with such devices were bad. I ended up with a corrupted display on my PC 4 years ago when I tried using such a device (TE-104, a UCC4 PCI DVR clone card)and I couldn’t get it to work at all. Apparently it required a display of 1024 x 768 and my monitor then could only display 800 x 600. As the saying goes, “once bitten, twice shy”. 🙂
Next you need cameras. There are many choices from CMOS to CCD cameras. There are even IR-cameras which can take images in the dark. Go for CCD cameras since they are better than CMOS cameras. As for IR-cameras, they are only good for close distances, so don’t bother using them outside of the house. I bought one which is supposed to be good for 25 metres but it is completely useless at that range. During demonstration, they do it in a small darkened box, so it looks fantastic, unfortunately on-site, the camera doesn’t work at all in the dark. Remember my warning when you go shopping for the cameras.
Expect to spend around RM150 for a CCD camera and RM250 for an IR-camera. Since my DVR supports 4 cameras, I bought three IR-cameras. For the other camera, I reused my old CMOS camera which has served me well in the past.
Don’t forget to pick up the BNC connectors and the cables for wiring. You need 2 BNC connectors per camera (RM2.50 each) and RM100 for 100 metres of cable. You’ll also need a BNC to RCA cable to connect the DVR to your television. You may need other things such as cables for power supply and electrical sockets if your house does not have the necessary wiring to power up the cameras.
So roughly the equipments should set you back around RM2500. You can get a cheaper price by buying cheaper DVR (i.e. RM900 for VS5204UK) or by selecting cheaper cameras. Don’t forget to shop around, you may get cheaper prices elsewhere.
Putting It Together
Identify the sites where you want to set up the cameras. Install them and lay down the cables from the cameras to the DVR. Configure the DVR properly. You can set the option so that recording occurs only when there is motion or movement in the area. This will reduce the hard drive requirement tremendously.
To configure the DVR, click on the “Menu” button. Enter the password (i.e. 88888888) and you will see the following screen;
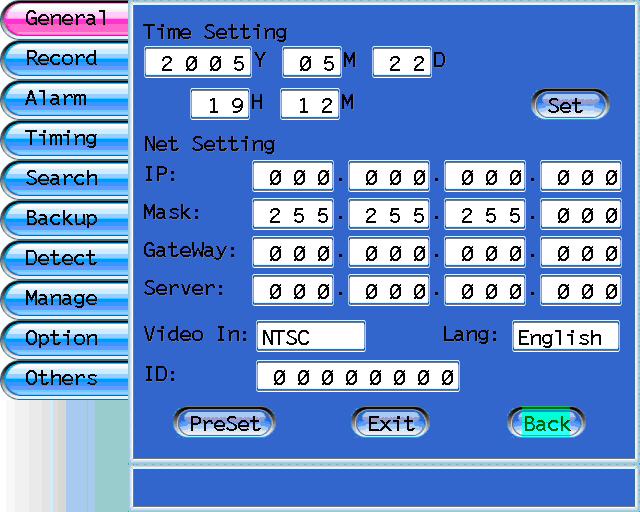 |
Upon getting the this screen, please correct the time setting.
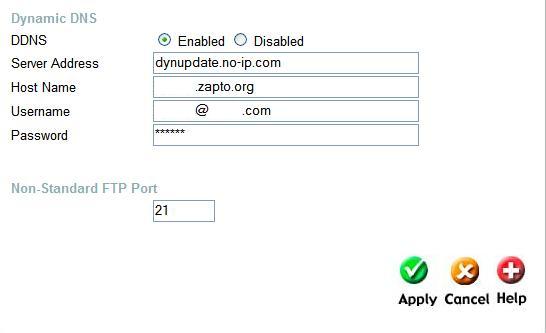
For Net setting, please use the following;
|
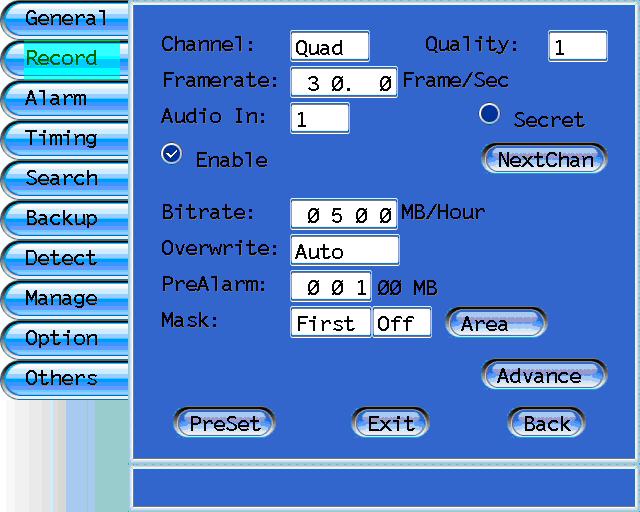 |
Under record, select the quality of image that you want to record. 1 = lowest quality and 7 = highest quality. The higher the quality, the larger hard drive space required and the shorter amount of time recording before the previous clips gets overwritten.
For example for a 320 GB hard drive at quality setting of 1, it would be about 800 hours (about 33 days) of continuous recording before it starts overwriting the earlier clips. At 7, it would be 200 hours (about 8 days) of continuous recording before it starts overwriting the earlier clips. Set the overwrite to Auto. |
 |
Let us ignore Alarm, Timing & Search. </p/>
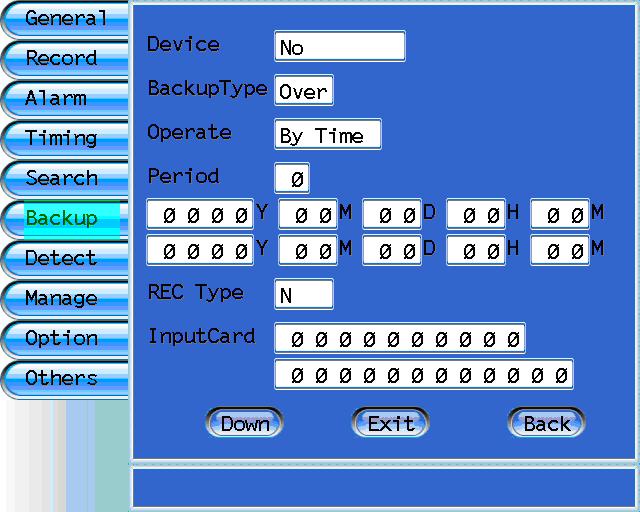
Backup is used when you want to backup the recording elsewhere. For example you want to backup the clips of a robbery. Select the device for backup (either HD, USB or Net). HD refers to the slave drive in the DVR, if installed. For USB, you can only use a thumbdrive of less than 1 GB, in FAT format. You can’t use the usual external HD since the DVR will only backup into a FAT format hard drive (size limited to less than 4.096 GB). Selecting Net will allow you to backup into a computer on the network. Now set the time range of the incident that you want to download and save it. |
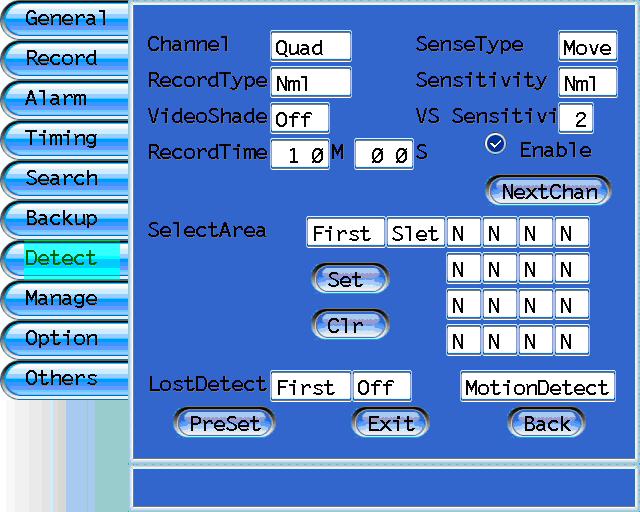 |
This is what I like best about using a DVR. You can set it to record, only when there is movement in all or any of the cameras. When I was using VCR to record, it was pure hell going through the tapes, looking for possible suspects. Now I only have to watch clips when there are people moving about.
Set the SenseType to Move. You can set the sensitivity from the highest to the lowest. You can even select which of the 16 possible areas on the screen to be sensitive to movements. |
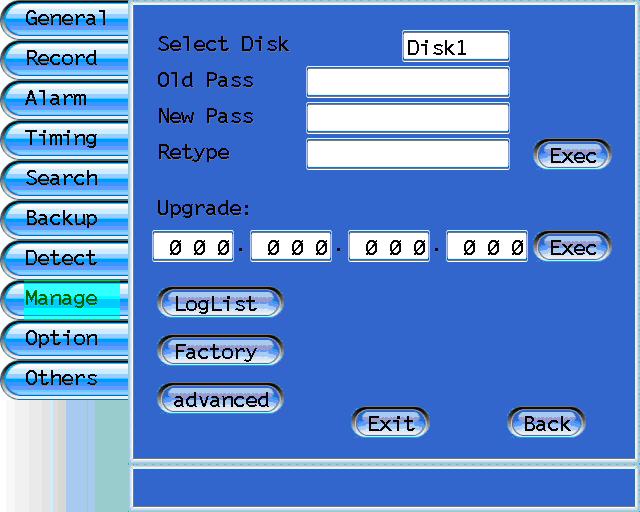 |
Under Manage, you can reset the password for the hard drive.But when you reset the password, the hard drive will be reformatted. So think very carefully whether you want this. |
 |
Most importantly you can reset the management password so that only you can access the DVR from the Net. It is not the same as the HD password. Please remember the password that you used here. We will need it later. |
Now connect the DVR to the router using a network cable. Use the diagram below as a guide.
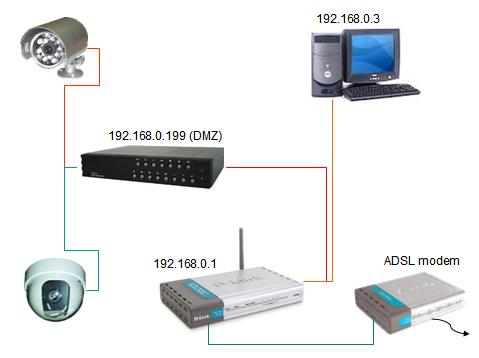
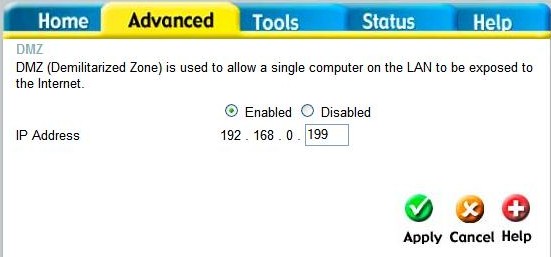
You will have to configure your router to put your DVR in the DeMilitarised Zone (DMZ) so that you can access your DVR from outside of your home. DMZ (DeMilitarised Zone) is used to allow a single computer/IP device on the LAN to be exposed to the Internet. Please refer to the diagram below for guidance. If it doesn’t make sense to you, please refer to your router’s manual.
Identifying Your Broadband’s IP Address
I would like to thank Dr Badrulhisham Bahadzor (surgeon and Faculty of Medicine UKM webmaster) for his help on this matter.
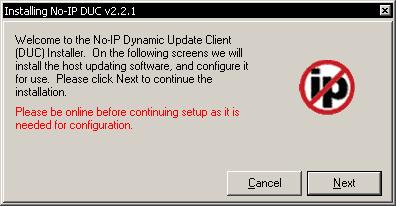
As we all are aware, our broadband’s IP address changes on a regular basis. So if we are away from home, how can we identify our IP address? We can make use of DNS and redirection service to map the dynamic IP address. One such free service is No-IP. Just surf to their site, register your name, create an account and create a domain name such as palmx.no-ip.org. Then go to the downloads section and download the “No-IP.com Dynamic DNS update client”. Install the client on the PC/desktop which is in the same local area network as the DVR.
When configured correctly, the client will check your IP address at a given time interval checking to see if your IP has changed. If your IP address has changed it will notify the dns servers and update the IP corresponding to your No-IP/No-IP+ hostname.
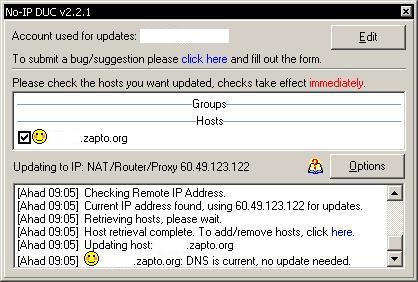
I set mine to be updated every 30 minutes.
If you are using a router that supports dynamic DNS, then there is no need to use the above setup to update the IP address. Just configure your router accordingly by following the instructions HERE.Thanks to declan of MalSingMaps.com for his help on this matter.
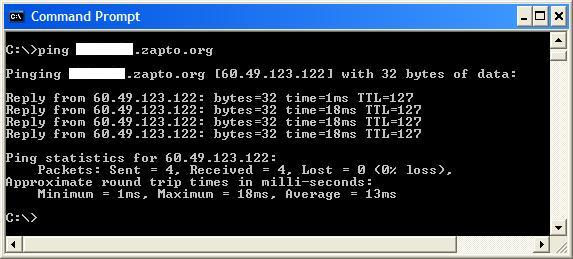
So when we need to identify the IP address of our broadband connection, we just open up our Command Prompt and type “ping <domain name>”; i.e. “ping palmx.no-ip.org”. Immediately we will see the ip address of the streamyx connection displayed, as demonstrated below.Please take note of the IP address here. You will need it later to configure remote viewing.
Remote Viewing of the CCTV
Install the DVR software on your notebook. It is available on the CD that comes with your DVR. Configure it properly as demonstrated below. Put in the IP address and you will be able to view the CCTV remotely. You can even search through the archive for prior CCTV images.
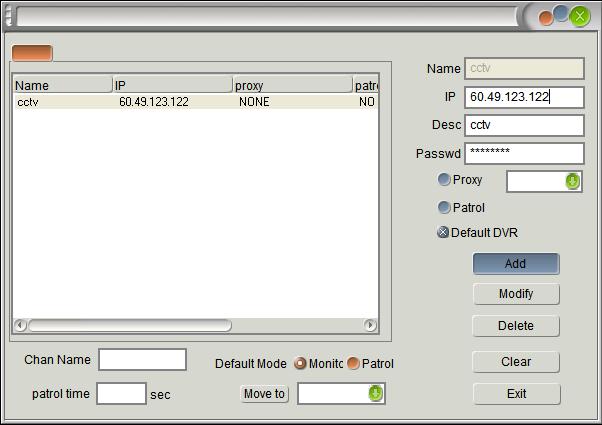 |
After installing the software, run the application. Click the “Channel Admin” button on the bottom right side of the screen. Fill up the boxes accordingly.
Once done, click on the “Add” button and then “Exit”. Whenever the IP of the connection changes, just click on the “Channel Admin” button on the bottom right side of the screen and modify the IP address. |
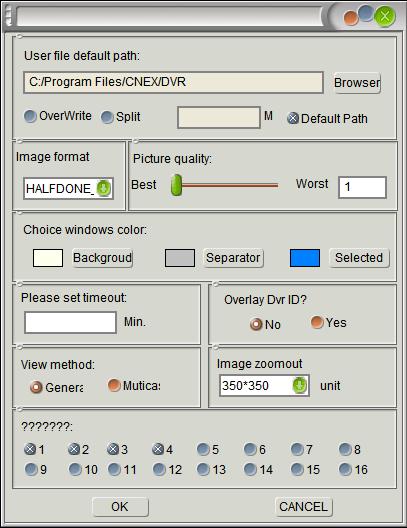 |
Now click on the “Set Parameters” button and change the image format to Halfdone_P. Otherwise it wont work. Stumped me for days. It required a visit to Reginex to solve it. |
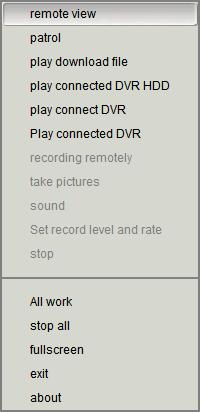 |
Now right click on the screen and the following menu will be displayed. Select remote view if you want to see what is going on on your cameras.
You can even record it on your PC. |
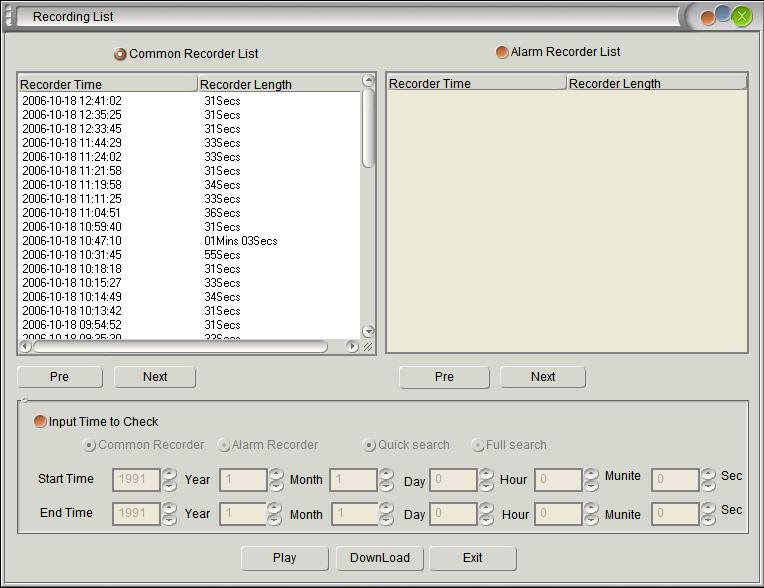 |
If you want to browse through the content of your DVR, click “play connect DVR”. You will see the requester as in the image on the left. Select the clips that you want to view.
You can even record it back on your PC. |
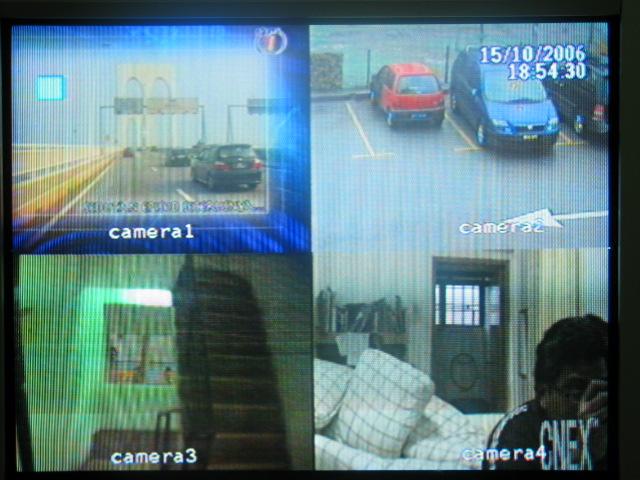
Displayed is the image as displayed on TV at the local site.
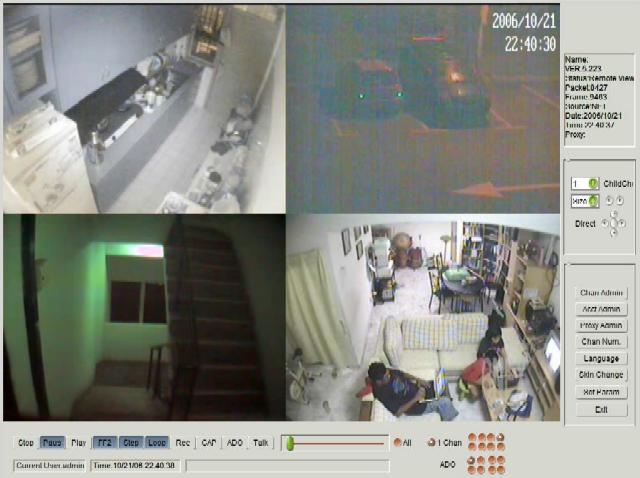
This is the image as seen on the notebook when connected remotely through the Internet. I’ve even demostrated the remote viewing on my notebook via GPRS to my former schoolmates during our Ramadan gathering last Saturday.
Using the appropriate software, you can even view the CCTV images on your PDA via GPRS. I tried and failed. Therefore if this option is important to you, get them to make it work for you before you buy their stuff.
Conclusion
At least now when my house alarm goes off and the alarm system contacts me via phone, I can switch on my notebook, log in via GPRS and do remote viewing of my CCTV. Based on the images, I can take the appropriate action. I can even send the images to the police if necessary.
It was easy enough to set it up. I did it during the little free time that I have during this weekend, on my own. Remember that I am a medical doctor, not a technician and I could set it up on my own. If setting it up sounds like too much trouble, you can just buy the equipments and pay somebody else to set it up for you.
Semoga Allah selamatkan kita semua.